
Monday, March 17, 2014
Coming Soon!
Thursday, February 27, 2014
DIY: Colored Mason Jars
.jpg) |
| My first batch of jars using the method below. |
Here's what you need:
- Food color (not the gel type, just the old fashioned cheap stuff)
- Water
- Disposable bowls (easier clean up)
- Plastic spoons
- Modge Podge (Glossy - Matte will not turn out as well)
- Paper towels for clean up
- Aluminum Foil
- Wax or Parchment Paper
- Two cookie sheets
- Preheated oven to 200 degrees (F)
 |
| Red and Green Finished Jars. |
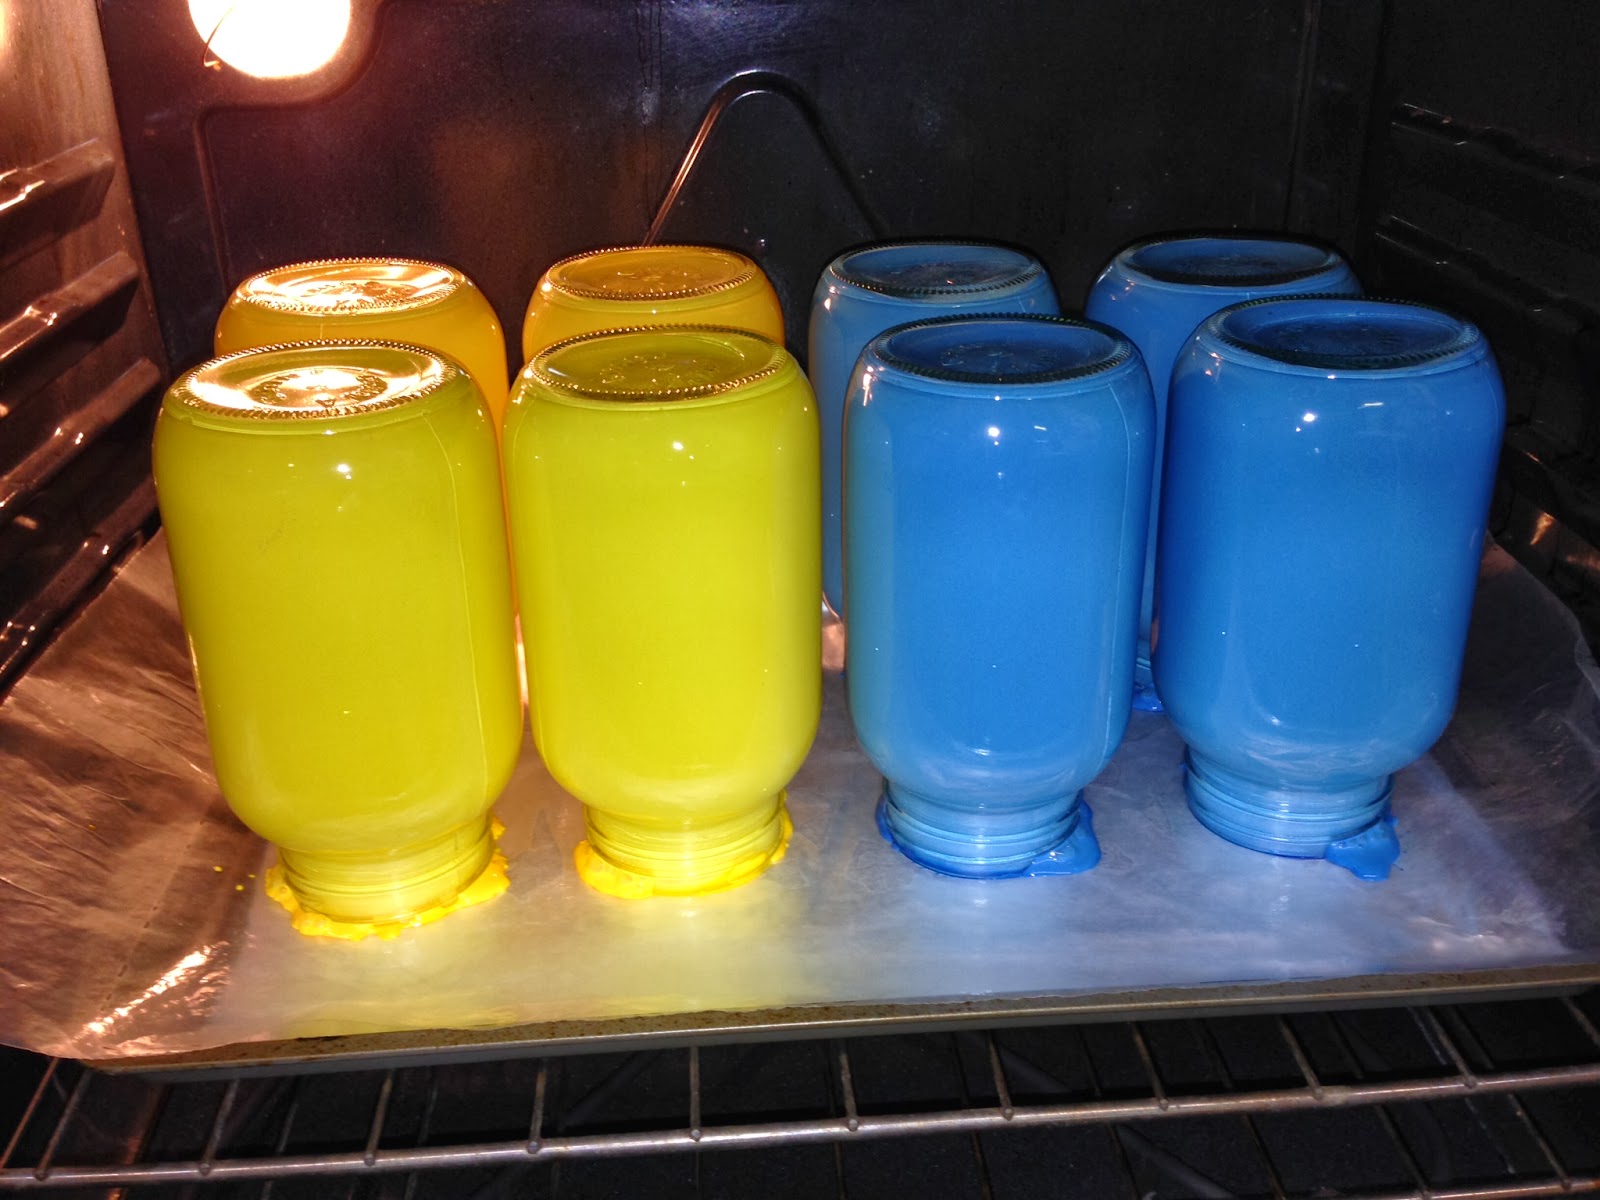
First, line one cookie sheet first with aluminum foil and then add a layer of wax or parchment paper. This is because the mixture will seep through the paper in places and the foil protects your cookie sheet. I also threw some on the second cookie sheet just as a safety precaution. I use two cookie sheets instead of one. You'll be glad you used two sheets - it's just easier when you flip the jars.
 |
| Notice the initial pastel colors. |
I suggest that you mix the water and food color in a disposable bowl. You will use 18 to 25 drops of food coloring (or more if you wish for it to be darker in color, just tint it until you get the color you wish) and two teaspoons of water. Mix well. Next, add four teaspoons of Modge Podge and stir until well mixed. Please note that the color will look pastel in color - be patient!
 |
| Another batch in progress. |
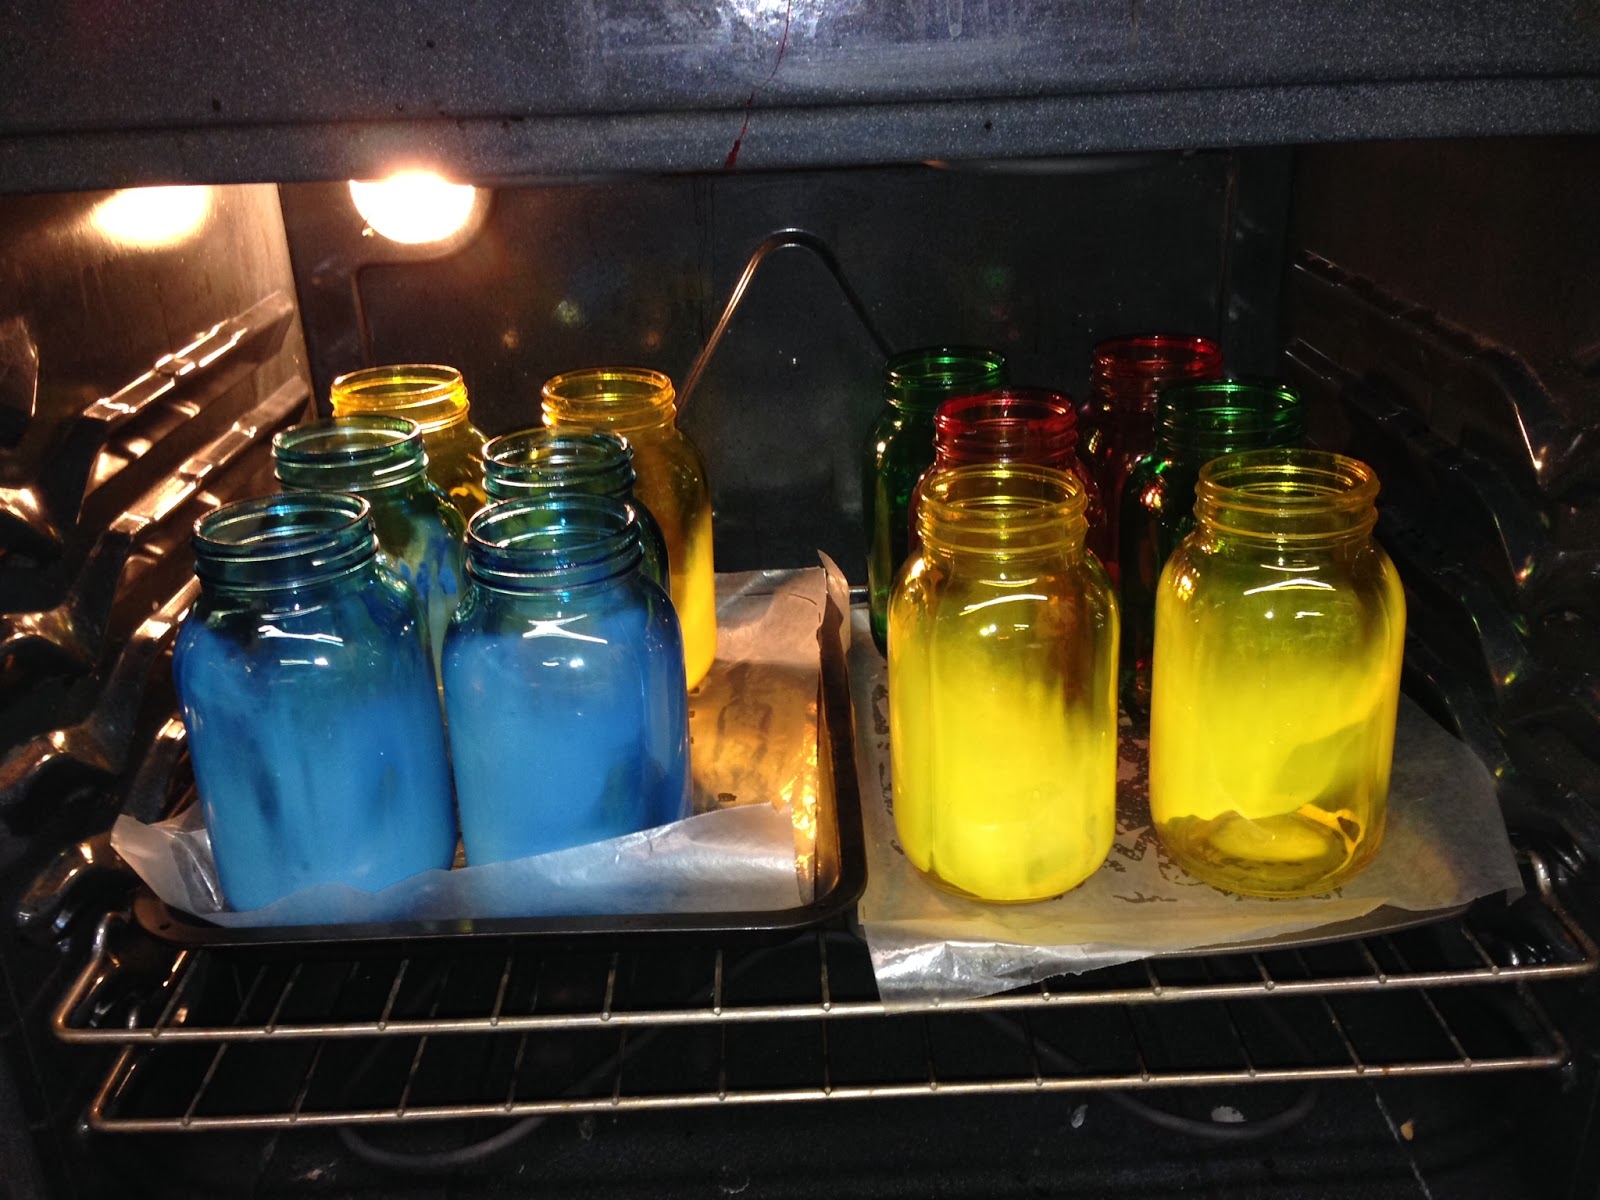 | |
| Combining them as I go. |
If you jars are the color you're wanting, when they have cooled and set for a few hours, you are done. However, if you are going to use the jars (like I am), you must add a clear glass sealant (glossy finish), available at your local craft store. I recommend letting your fresh jar sit overnight before adding the sealant, and allow your jar to cure as directed on the sealant's instructions. I am using Tree House Studio Clear Acrylic High Gloss Sealant which dries fast and does not run.
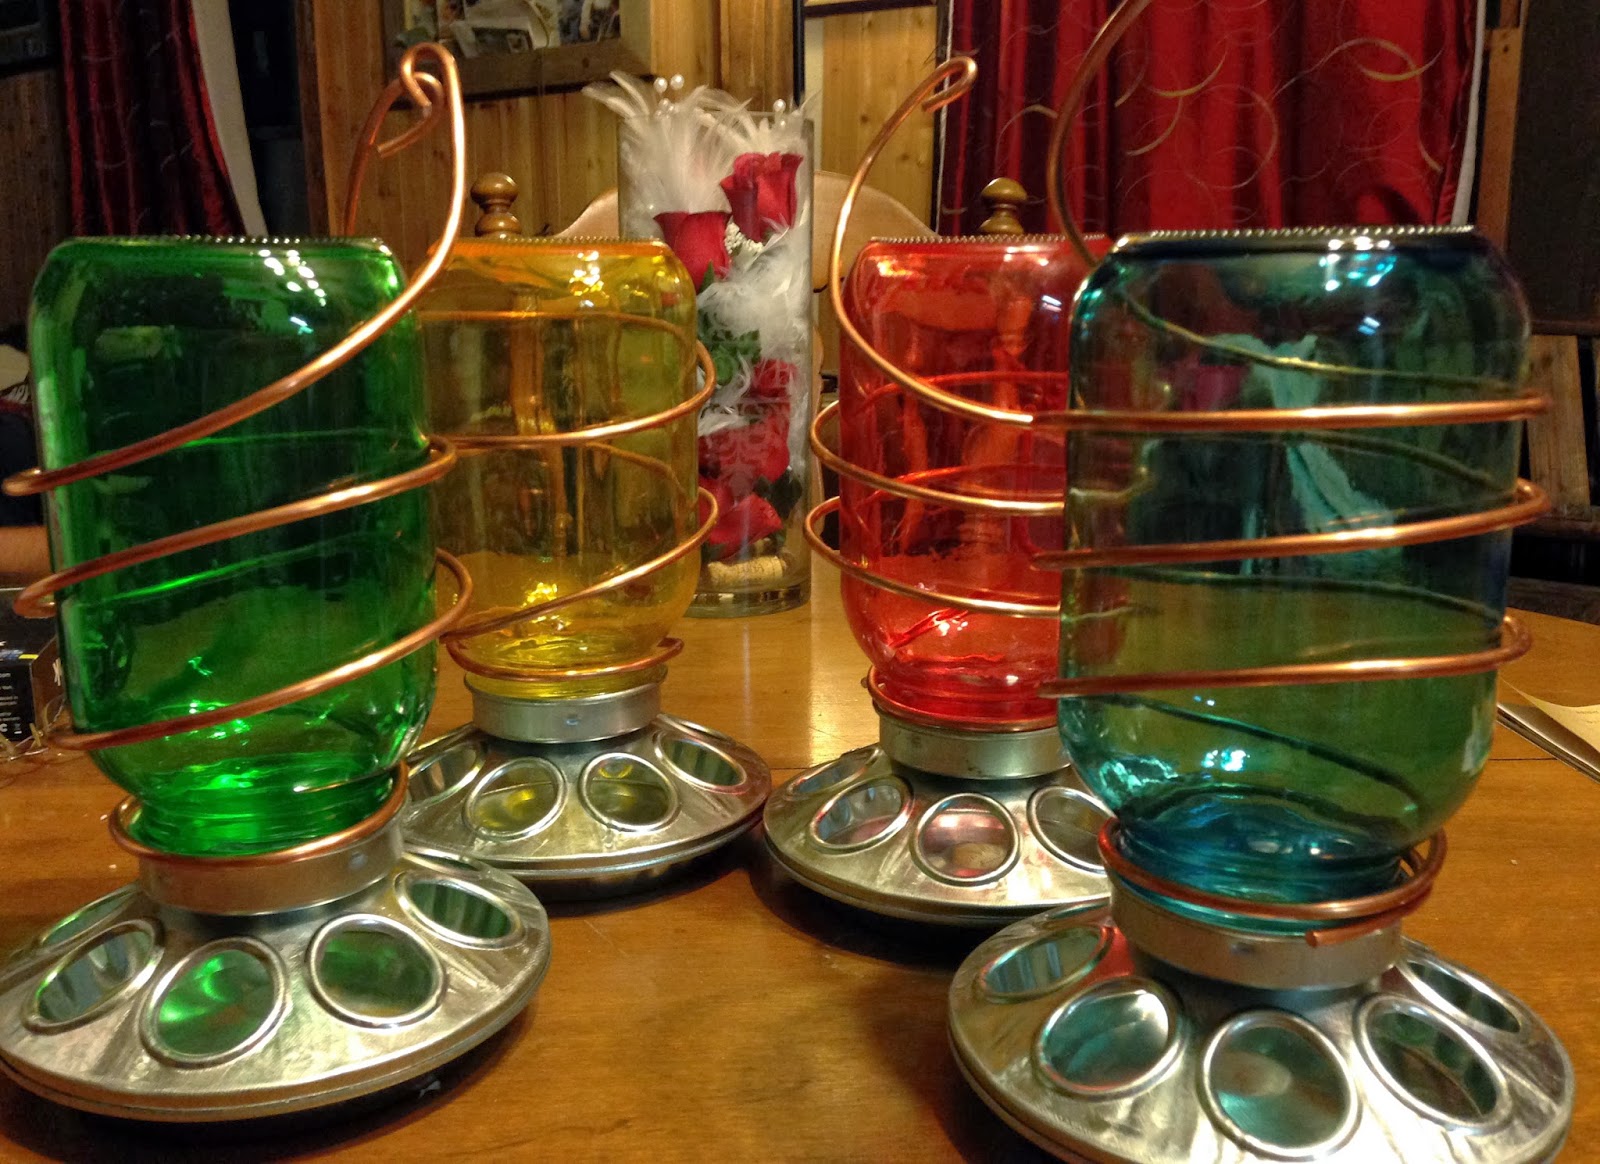
Update: I finished my jars, added my chick feeder base and copper wire to make my feeders. Here's what they look like - I think they're keepers!
.jpg) |
| The finished products. I also did these originally in clear, and it took my backyard birds about 3 minutes to begin eating from them! |
Tuesday, February 25, 2014
Mason Jar Feeder (DIY)
 |
| Update: By popular demand, I will make you a feeder so you don't have to - contact me for more information. If you want to make your own, I suggest you plan to make at least 4-5 at a time because of the cost for the copper wire if you're using it instead of regular wire). Do the birds like them? See the images at the bottom, taken less than 5 minutes after hanging the yellow one on a cold sleet-filled day. |
 |
| My completed feeder. |
 |
| A nuthatch eyes my newly crafted feeder. |
 |
| He can't resist! |
Within minutes of hanging the new feeder, I had a White-Breasted Nuthatch enjoying a
 |
| He kept coming back! |
 |
| A simple design made just by wrapping some spare wire we had around the house around the jar (once at the base, loop it around the original loop to secure it, then bring it up and over to the other side and wrap it through the base loop to secure it and you're done). Update: Check out my hand-dyed jars used to make feeders. It was time consuming, and the sealer took 24 hours to dry (and you have to be very careful while using it to ensure that coats evenly. It was worth it - don't you think? These cost more than the ones above because of the costs to dye and seal the jar and of course, the copper wire is the biggest expense. |
        |
Monday, February 10, 2014
DIY Suet for Birds for about 35 cents each!
 |
| A finished suet cake |
Instead of paying $3.99 to $5.99 for suet cakes, I decided to try to make my own and see how much they actually cost me, how difficult they were to make and if the birds really prefer them over store bought cakes. I researched several recipes and although I was skeptical that these would actually stay together, I made my first attempt this morning. After making the first batch, I decided to add some additional ingredients to a second batch and they turned out quite nice. The birds seem to like them even more than the most expensive cakes from the store.
 |
| Same recipe with added raisins, cashews and seed. |
- Vegetable shortening (lard is an option but it's more expensive; some say use bacon grease but I read online that many birds don't really care for it), large can (still have about half of the can left): $.90
- Chunky peanut butter (med. jar - can save by buying a larger jar next time!): $1.25
- Quick Oats: $.50 (still have most of the container left which was only $2.79)
- Corn Meal (yellow): about $.40 worth
- Flour: about $.25 worth
Additionally in the second batch I made I added a handful of raisins and 1/4 c. cashews along with a cup of bird seed - probably cost me about 50 cents more for the second batch). The above batches made 11 cakes, for a cost of about 35 cents each! I am being generous with my cost estimates since I am using only a partial amount of a jar or bag. If I put the nuts, seed and dried fruit or raisins in all the cakes, it would slightly increase the cost but I made about 1/2 with and 1/2 without. They are very easy to make. To make the holes I used a wooden spoon handle and pushed it through after I made a cake. This way, the finished cake after sitting in the fridge to harden would slide onto the metal feeder.
 |
| First cake - front feeder. The back two cakes are from Wild Birds Unlimited. |
How to make your own:
Melt 1 cup chunky peanut butter and 1 cup shortening or lard in a large microwave safe bowl - about 1:30 on high in microwave, stir well and the remaining lumps will melt. Stir in 2 cups of minute oats, 2 cups yellow corn meal (not mix!), 1 cup flour, 1/2 cup sugar (in winter, gives them a calorie boost but you can leave it out in other season). Mix well. It will be crumbly! If desired, add in nuts, seeds, cereal such as Cheerios, raisins or dried fruits but if you are adding a lot of extras, you may have to either add a little extra shortening/peanut butter or cut down on the corn meal/flour - you can adjust as needed but don't make it too wet!
The mixture will be crumbly but you can compact it by hand. Shape it into balls or discs, or press into a square pan and cut it if you have a square cage suet feeder. Also, you can press it into plastic cups. To make it hang on a string, cut a piece of sturdy plastic in a small circle for support, staple it to a string or rope and pack the suet around it. Don't worry if it seems crumbly - it will pack and set up. Place on wax paper and put into the fridge or freezer until set well (overnight in fridge, a few hours in the freezer). If you used a plastic cup, just cut the cup away with scissors. Store any extras in the fridge or freezer wrapped in plastic or a Ziploc bag.
 |
| He seems to like the new cake! |
 |
| Testing to see if adding more weight will cause the lower one to break! The Cardinals really like these! |
 |
| Adding more including the ones with seed/nuts/fruit. None of them are cracking apart, and the birds love them! |
 |
| They seem to prefer the new ones over the store bought ones. |
 |
| Nuthatches and Juncos are crazy for these! |
 |
| Looking for a place to land. |
For The Birds
I've recently discovered how fun and fulfilling it can be to feed birds. I've almost always had a little feeder but it was usually out of sight, out of mind. We put a feeder up in front of my kitchen window and without a few minutes, I had Carolina Chickadees and Tufted Titmice picking seeds from the feeder. It didn't take me long to notice the Cardinals would eat the seed off the ground but not approach the feeder - it was too small for them and when they would try to land on it, it would swing noisily into the window.
 |
| A female Cardinal enjoys some seed on the deck railing. |
 |
| Male Cardinal and Suet bell. |
In researching more seed mixes, I also picked up some specialty seed mixes at TSC (noting the ingredients more carefully) with blends for Cardinals as sometimes we have 6 to 8 at a time circling the feeders. We've since added a large cabin-type feeder on a natural wood pole, another large feeder with wire netting that feeds both the larger birds that can nest on the pan and the clinging smaller birds, another small feeder off the deck, a thistle feeder and five suet feeders. I'm in bird heaven!
So far, I'm seeing Cardinals, Blue Jays, Downey and Red-Bellied Woodpeckers, and Song Sparrows, Dark-Eyed Juncos, American Goldfinches, and Tufted Titmice on a regular basis. Most recently, I've also seen some White-Breasted Nuthatches. I'm loving my little feathered friends and look forward to watching them every day!
 |
| Male and Female Cardinals |
 |
| Red-Bellied Woodpecker |
 |
| Blue Jay |
 |
| I call this the "bird tree!" |
 |
| Snow beards are so cute! |
 |
| Male Cardinals and an American Goldfinch |
 |
| Dark-Eyed Junco (and a dirty window!) |
 |
| Hmmm...what is this stuff again? |
 |
| Juncos in flight |
 |
| Bird on a Wire...American Goldfinch |
 |
| Landing on Runway 1. |
 |
| A timid Blue Jay? Apparently so! |
 |
| Dark-Eyed Junco in flight |
 |
| Blue Jay |
 |
| Coming in for a bite to eat! |
Tuesday, February 5, 2013
DIY Fabric Softener (now we're talking!)
I love the smell of freshly scented laundry, but there are times when Jon doesn't want things to "smell pretty." When it's time to go to the woods for deer hunting, I have been told there are a list of No's that I need to understand: No perfume, No hairstyling products, No fabric softener in the clothes. Apparently, deer have an excellent "sniffer" and can smell us a mile away. Last time I forgot, I got doused in some kind of spray "scent-be-gone" stuff that left me and my hair feeling a little frazzled!
In researching for my next DIY project to save money around the house, I decided to look into fabric softener. Jon and I like to save money when we can, and I feel like it's my job to find ways to cut spending where it's unnecessary while looking out for our environment. When you combine that with having two sons in college and retired parents, finding ways to help THEM save money is even more rewarding than ever! In fact, I have some jars of laundry detergent that I made for them ready to go the next time we all get together - hopefully soon!
One of the biggest things that I try to remember when I'm working on a project is time and effort needed to complete a task. I'm all about saving money but sometimes, when the effort is too great for the reward or if it leaves a mess that I'll have to spend a lot of time cleaning up, it's hard to justify it. In this case, I'm quite happy to report that it's so easy to make this stuff and on days when Jon's not so worried about my "smell good" fetish, I can just use white vinegar on its own, although you can mix it 1:1:4 with baking soda (4 cups hot water) if you want extra softness.
Trying to stay all-natural? Omit the hair conditioner and add baking soda as mentioned, note the foaming reaction is ok - it's not going to 'cancel out' the vinegar as it makes a salt that is a good buffer. You can choose to add essential oil for scent if you wish.
Cost per load (original recipe): less than two cents.
In researching for my next DIY project to save money around the house, I decided to look into fabric softener. Jon and I like to save money when we can, and I feel like it's my job to find ways to cut spending where it's unnecessary while looking out for our environment. When you combine that with having two sons in college and retired parents, finding ways to help THEM save money is even more rewarding than ever! In fact, I have some jars of laundry detergent that I made for them ready to go the next time we all get together - hopefully soon!
One of the biggest things that I try to remember when I'm working on a project is time and effort needed to complete a task. I'm all about saving money but sometimes, when the effort is too great for the reward or if it leaves a mess that I'll have to spend a lot of time cleaning up, it's hard to justify it. In this case, I'm quite happy to report that it's so easy to make this stuff and on days when Jon's not so worried about my "smell good" fetish, I can just use white vinegar on its own, although you can mix it 1:1:4 with baking soda (4 cups hot water) if you want extra softness.
ORIGINAL FABRIC SOFTENER
Are you ready for this?- 2 cups inexpensive hair conditioner such as Suave
- 6 cups hot water
- 2 cups white vinegar (no, your clothes won't smell bad afterward)
Trying to stay all-natural? Omit the hair conditioner and add baking soda as mentioned, note the foaming reaction is ok - it's not going to 'cancel out' the vinegar as it makes a salt that is a good buffer. You can choose to add essential oil for scent if you wish.
Cost per load (original recipe): less than two cents.
DIY Laundry Soap - Yes, Please!
My Pinterest interests can sometimes get the best of me. I find myself pinning craft ideas (I can't crochet, but for some reason I think if I save a pattern that perhaps my mother will make this for me, or maybe I'll learn to do it myself someday!), recipes and all kinds of DIY project ideas. I will admit the crescent rolls filled with Nutella and cream cheese is NOT as good as it sounds. Jon and I were quite disappointed. I don't know yet how to share that information with my Pinterest friends but I can honestly say that it is one of the worst recipes I've tried (in regard to taste). I still find it to be a tremendous "tool" to find new spins on old recipes or for ways to try to save money. I'd like to be able to have a garden at some point (not a big one), and finding ways to harvest our own food (whether it be growing it or hunting it) and saving money while improving our home is a big thing to me. Saving money means more opportunities to spend on other things (like hunting trips, vacations or shoes!).
I happened the other day on a Pin from someone else for DIY Laundry Detergent and for the 10th time, I told myself, "Some day I'm going to do that!" This time, I saved it on my board and when I was in the store today, I happened to remember for a change! I purchased a box of 20 Mule Borax ($3.38), a box of Arm & Hammer Washing Soda ($3.24) and guessed at the amount of Fels Naptha bars of soap I would need and bought three bars ($0.97 each) for a total of $9.53. With tax, it came to $10.82 to make four full quart jars of detergent ($2.72 per jar). I was thrilled because you only need one to two heaping teaspoons per load. My last purchase of detergent was over $6 for a discount brand that promised 32 loads. I measured out a jar using heaping teaspoons (one per load - I tested the detergent this morning and it works great but for super large loads or very dirty laundry, you might need two scoops). I was able to get 55 heaping teaspoons from one jar. That's less than 5 cents per load! And YES, because it's low suds (see more below about bubbles), you can use it in your HE washing machine. It's also better for septic systems than traditional store-bought detergent.
After I got home, I started reading. I was concerned about the messiness of heating water on the stove and melting the Fels Naptha. I continued to research because I wanted to make sure that I wouldn't ruin something of Jon's that might be sentimental as he has a lot of things that were given to him from family members over the years. Just when I started to close out my search window, a link caught my eye that boasted of a way to make this detergent without all the mess. Of course, I'm in!
I found everything I needed to make the detergent at Wal-Mart in the laundry aisle. To make the detergent, simply grate one bar of Fels Naptha using a cheese grater (if you have a food processor, lucky you!). It will look like grated cheddar cheese so watch out if you have children and don't let them mistake it for food while you have your back turned. Next, put this into a good quality blender and grind it as fine as possible. I've made a note that we need a new blender! Then put this into a large bowl and add two cups of the Borax and two cups of the Washing Soda. Stir it all up with a wooden spoon until it's mixed. Pour into 1 qt. Mason jar and label! With three bars of Fels Naptha soap, I was able to get four full quart jars and still have some Borax left over for other household uses (or to deter ants and spiders around the baseboards of the house).
To use, you only use 1 to 2 heaping teaspoons of the powder per wash load. Notice that it will NOT bubble like regular detergent - this is an unnecessary result of bubbling agents that are added by makers of commercial soaps because we've been brainwashed over the years to think that more bubbles mean cleaner outcome. It's a myth. Put the homemade detergent in first and start your water, then add your clothing after a minute or two. For heavily soiled items, you may wish to use a little more soap but usually one to two heaping teaspoons will do the trick!
I have to make an additional note that this was my first time to make the detergent so I purchased an entire box of canning jars at $9.44 but will be reusing these over and over (and for other projects), so I don't really consider it a cost each time to produce the detergent. I also bought a roll of labels so I could write on the label what was inside the jar and how much to use ($3.97 for a whole roll, so again, not really an expense considering I will be using these for other projects). In the future, I hope to just refill the empty or near empty jars and not have to spend any more for storing and labeling the jars. I also read that you can use other bars of soap but the Fels Naptha is supposed to be a great soap for overall cleaning and removing stains/grease. My detergent smells nice but not too overpowering so we'll see how it works out!
So how much does this actually save us? The cheapest detergent is usually about $5.25 (Ultra Purex). It will do 46 loads of laundry. The cost per load is about 11.5 cents per load. HE washing machines usually use special types of detergent. For instance, Tide Cold Water costs 23 cents per load and is safe for HE machines while working well in cold water only. I use only cold water (and our washing machine isn't HE), and find that this detergent works as well as anything I've ever used. I do not compare it with the low-end dollar store detergent simply because in my experience, these detergents often don't perform well and usually I end up using a little more than recommended in order to get good results in cold water.
One last "savings" notation: space and a greener environment. I'm always looking for ways to organize, and clutter isn't a good thing. I hate huge jugs of cleaner and my little reusable quart jar means less space on the shelf and no plastic in the landfill. I'll take that any day! The detergent doesn't contain bleach (bad for the septic system), and if I need to whiten more than usual, I can use a little vinegar in the wash cycle before the rinse and get great results without harming the septic system.
I happened the other day on a Pin from someone else for DIY Laundry Detergent and for the 10th time, I told myself, "Some day I'm going to do that!" This time, I saved it on my board and when I was in the store today, I happened to remember for a change! I purchased a box of 20 Mule Borax ($3.38), a box of Arm & Hammer Washing Soda ($3.24) and guessed at the amount of Fels Naptha bars of soap I would need and bought three bars ($0.97 each) for a total of $9.53. With tax, it came to $10.82 to make four full quart jars of detergent ($2.72 per jar). I was thrilled because you only need one to two heaping teaspoons per load. My last purchase of detergent was over $6 for a discount brand that promised 32 loads. I measured out a jar using heaping teaspoons (one per load - I tested the detergent this morning and it works great but for super large loads or very dirty laundry, you might need two scoops). I was able to get 55 heaping teaspoons from one jar. That's less than 5 cents per load! And YES, because it's low suds (see more below about bubbles), you can use it in your HE washing machine. It's also better for septic systems than traditional store-bought detergent.
.JPG) |
| Four full quart jars of homemade laundry detergent - at less than a nickel a load! |
After I got home, I started reading. I was concerned about the messiness of heating water on the stove and melting the Fels Naptha. I continued to research because I wanted to make sure that I wouldn't ruin something of Jon's that might be sentimental as he has a lot of things that were given to him from family members over the years. Just when I started to close out my search window, a link caught my eye that boasted of a way to make this detergent without all the mess. Of course, I'm in!
I found everything I needed to make the detergent at Wal-Mart in the laundry aisle. To make the detergent, simply grate one bar of Fels Naptha using a cheese grater (if you have a food processor, lucky you!). It will look like grated cheddar cheese so watch out if you have children and don't let them mistake it for food while you have your back turned. Next, put this into a good quality blender and grind it as fine as possible. I've made a note that we need a new blender! Then put this into a large bowl and add two cups of the Borax and two cups of the Washing Soda. Stir it all up with a wooden spoon until it's mixed. Pour into 1 qt. Mason jar and label! With three bars of Fels Naptha soap, I was able to get four full quart jars and still have some Borax left over for other household uses (or to deter ants and spiders around the baseboards of the house).
To use, you only use 1 to 2 heaping teaspoons of the powder per wash load. Notice that it will NOT bubble like regular detergent - this is an unnecessary result of bubbling agents that are added by makers of commercial soaps because we've been brainwashed over the years to think that more bubbles mean cleaner outcome. It's a myth. Put the homemade detergent in first and start your water, then add your clothing after a minute or two. For heavily soiled items, you may wish to use a little more soap but usually one to two heaping teaspoons will do the trick!
I have to make an additional note that this was my first time to make the detergent so I purchased an entire box of canning jars at $9.44 but will be reusing these over and over (and for other projects), so I don't really consider it a cost each time to produce the detergent. I also bought a roll of labels so I could write on the label what was inside the jar and how much to use ($3.97 for a whole roll, so again, not really an expense considering I will be using these for other projects). In the future, I hope to just refill the empty or near empty jars and not have to spend any more for storing and labeling the jars. I also read that you can use other bars of soap but the Fels Naptha is supposed to be a great soap for overall cleaning and removing stains/grease. My detergent smells nice but not too overpowering so we'll see how it works out!
So how much does this actually save us? The cheapest detergent is usually about $5.25 (Ultra Purex). It will do 46 loads of laundry. The cost per load is about 11.5 cents per load. HE washing machines usually use special types of detergent. For instance, Tide Cold Water costs 23 cents per load and is safe for HE machines while working well in cold water only. I use only cold water (and our washing machine isn't HE), and find that this detergent works as well as anything I've ever used. I do not compare it with the low-end dollar store detergent simply because in my experience, these detergents often don't perform well and usually I end up using a little more than recommended in order to get good results in cold water.
One last "savings" notation: space and a greener environment. I'm always looking for ways to organize, and clutter isn't a good thing. I hate huge jugs of cleaner and my little reusable quart jar means less space on the shelf and no plastic in the landfill. I'll take that any day! The detergent doesn't contain bleach (bad for the septic system), and if I need to whiten more than usual, I can use a little vinegar in the wash cycle before the rinse and get great results without harming the septic system.
Subscribe to:
Posts (Atom)